
Showing posts with label ornaments. Show all posts
Showing posts with label ornaments. Show all posts
Thursday, December 6, 2012
Glitter Pink Christmas!
Shabby Chic and all glittery and pink Christmas Treasury featuring hand crafted and vintage treasures from Etsy!


Sunday, December 18, 2011
Felt Rose Christmas Tree Ornament
Ok, here is one last frugal (cheap) Christmas craft for this year! This time I branched out and found my inspiration and supplies in the $1.00 section of Michaels.


This ornament is so easy and quick, a perfect rainy day holiday craft project with your kiddos. First step, remove Christmas trees from ring, then remove enough of the back off the contact paper to cover your tree shape, both back and front.


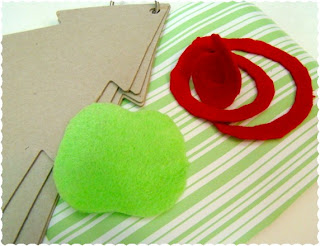


Supplies:
Christmas tree shapes $1.00 for ring of 5
cardboard shapes and measure 6"
tall.
Striped contact paper $1.00
Felt - already had on hand, but only cost
29. for each sheet
Glitter
Glue
Ribbon
This ornament is so easy and quick, a perfect rainy day holiday craft project with your kiddos. First step, remove Christmas trees from ring, then remove enough of the back off the contact paper to cover your tree shape, both back and front.


Now that super duper easy step is done it's time to decorate. I decided to cut scalloped shaped strips of the bright green felt and glued down on the tree.

Then I started creating my three little felt roses, by first cutting felt circles, which you then cut into spirals. Next you simply start rolling the spirals into a rose shape. Now cut little leaf shapes. Attach your roses and leaves to your little trees and once they are nice and dry start applying glue for your glitter!

Happy Holidays and Happy Crafting!
Beth
Linking up with: Nifty Thrifty Sunday, I Heart Nap Time, Sunday's Best, Southern Institute, Homemaker on a Dime, Craft o'Maniac, Sumo's Sweet Stuff, Not Just a Housewife, Sugar Bee crafts, Homework, Giggles Glitz & Glam. Ladybug Blessings, Saved by Love Creations, Mom in Time out, Free Pretty Things, 36th Ave., WhipperBerry, Somewhat Simple, Simply Designing, Fingerprints on the Fridge
Friday, December 9, 2011
Creating Christmas with Lulu Lang

Hello! I am Tracy from Lulu Lang. I am so excited to be Alyssabeth's guest blogger today and share this holiday craft tutorial with you! The craft I am sharing is very special to me and has been part of my family for many years. When my grandfather was alive, he used to make tons of ornaments, decorations and beautiful wreaths out of pinecones which are always proudly displayed around my families' houses especially at Christmas time.


- Pinecones at least 3" tall
- Acorns with the tops on
- Dried milkweed pods - If you don't have any of these in your area you can find them online
- Pipe cleaners
- Golf tee
- Ribbon
- Silver or gold spray paint
- Black permanent marker
- Hot glue gun
- Craft glue
- Glitter (optional)
Spread out your pinecones, acorns, dried milkweed pods and golf tee on some newspaper and spray with spray paint. You will need to do several coats to make sure you've covered all of the areas.

Cut a pipe cleaner about 6" long, bend it into a 'V' shape and glue it to the core of the pinecone about 3/4 of the way up.


Thanks so much for letting me join you today, and happy holiday crafting!
Wednesday, December 7, 2011
Creating Christmas Glitter Chic Vintage Cookie Cutter Ornaments


This is probably my cheapest, quickest and one of my favorite Christmas Crafts this year! I used items that I already had around the house:

Sheet Music Scrapbook Paper
Glitter
Ribbon
Decorative items vintage and/or new
I used a vintage fur earrings, a tinybottle brush Christmas tree and a
vintage Santa graphic encased in resin
and antique lace
So how easy is this, well trace your cookie cutter out on the paper, cut out and glue into the cookie cutter. One this is dry paint glue around the inside and outside of cutter and glitter away! Once this is dry decorate the inside with your little decorations.


As always Happy Holidays and Happy Crafting My Friends!
Beth
Linking up with - Wow Us Wednesdays, Somewhat Simple, 36th Ave., Trendy Treehouse, Eisy Morgan, Thrifty 101, Thrifty Thursday, The Artsy Girl, House of Hepworth, Yesterday on Tuesday, Every Creative Endeavor, Free Pretty Things, Gingersnap Crafts, Whipperberry, Simply Desgining, Fingerprints on the fridge, Home is Where the Heart Is, The Charm of Home, French Cottage Home, Finding Fabulous
Monday, December 5, 2011
Creating Christmas with Jen at I Can't Stop Crafting
Hello AlyssaBeths readers! My name is Jen, and I am the gal behind I Can't Stop Crafting. I am pleased as can be to be sharing here today, it's always such a treat to be invited for a visit at another blog. Feel free to swing by my home turf to see what I've been up to lately, to link up to my weekly Head to Head Showdown link party, or just to say "hi".
I've been watching in amazement as it seems all of blog world has gone mad for burlap and jute crafting. The creative ideas people come up with, to jazz up humble burlap absolutely floors me. Who'd have thought there would be so many possibilities? Well, now it's my turn. I bought a roll of burlap the other day, and I put together this simple little wreath in a matter of minutes.
I started with the aluminum screw band from an old jar. I cut a long strip of burlap, 3-4 inches wide and using hot glue, adhered the strip of burlap to the screw band.

I then wound the burlap around the band, feeding it through the middle and wrapping it around until I'd worked by way around the entire band.

I secured the burlap in place with another dot of hot glue and trimmed any wayward strands from the burlap.
To spruce my little burlap wreath up, I added a few sprigs from a wired berry garland I bought years ago. I just wrapped the little sprigs around and hot glued the ends in place.

As for where you need such a tiny wreath? Well, perhaps you have a small shelf that needs adorning, like this:

Or wouldn't a handful of these wreaths tucked among the boughs of your Christmas tree be charming?

I think a set of these mini wreaths would make charming napkin rings as well.
Thank you so much for having me here today, AlyssaBeths! I hope you all have a wonderful Christmas, and enjoy each moment of the season!
Be blessed,
Thank you so much for having me here today, AlyssaBeths! I hope you all have a wonderful Christmas, and enjoy each moment of the season!
Be blessed,

Wednesday, November 9, 2011
Holly Jolly Etsy Christmas Gift Guide
Here is my Christmas Gift Guide #2! If you love handmade, creative and one of a kind gifts and holiday decor I know that you have found Etsy by now. I found Etsy quite by accident years ago and fell in love with the concept, and that I could purchase such creative, handcrafted items all year round, I didn't have to wait for a craft show and .... I could purchase online and it's delivered directly to my home!
Hope you take a look at my little Holly Holly Christmas Gift Guide, it's very bright and cheery.
Hope you take a look at my little Holly Holly Christmas Gift Guide, it's very bright and cheery.
Sunday, November 21, 2010
A Shabby Chic Glittered Christmas!
I love glitter and I love Christmas, so of course my favorite thing to do is to adorne as much as Ic an for Christmas in glitter!!! Here are a few of my latest glitterd adorned Christmas items in my Etsy store.


Shabby Chic Pink Toile Peace Dove Ornaments Set of Two

Shabby Chic White Snow Glitter Cross Ornaments with Vintage Ivory Pearl Earrings Decoration Set of Two


French Chic Glass Glitter Fleur de Lis Rosette Ornament Decoration
Elegant Angel with Golden Accents Hand Stamped Muslin Ribbon 3 Yards

Sunday, August 1, 2010
Pink Chic Christmas Puppy Gift Tags Set of 6


These would be wonderful gift tags, bookmarks, invitations, cards, ornaments, or used in your Christmas Décor.
Set of 6 tags, each measures 3 ½ x 2 ¾ inches and are printed on heavy 110 card stock.
Please feel free to contact me if you would like to request an order for a larger # of tags/cards, of if you would like to purchase without holes and ribbons.
Each order will come packaged in a cellophane bag tied with a ribbon.
Take a look around at my other Paper Art as well as my Resin Collage Jewelry, Vintage & Antique Décor at http://www.etsy.com/shop/Alyssabeths
Subscribe to:
Posts (Atom)