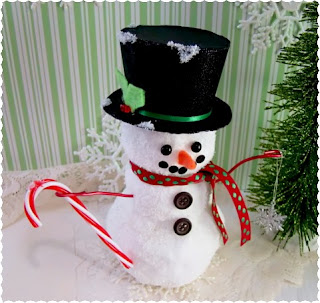
My holiday decorations include an entire room of snowmen and snow decor, my own little snow fairy land. And during another covert trip to the Dollar Tree I found the supplies to create this cute little Frosty the Snowman!
2 packages Styrofoam Balls, red floral wire, plastic snowflake ornaments, ribbon, plastic candy cane ornaments, silver glitter small snowflakes
Items I already had on hand: cotton balls, buttons, small Styrofoam coffee cup, black glitter card stock, snow glitter, felt, glue, glue gun and clear spray
Take three of the Styrofoam balls, cut the bottom on the largest flat on one side, the middle ball cute flat on 2 sides, attach the 3 balls with a glue gun. Once the stack is dry un roll your cotton balls (the cheap cotton balls are best for this) and glue over the Styrofoam stack with a glue gun. Make a mixture of 2 parts white glue & 1 part water paint this mixture over the cotton ball covered stack, now snow glitter away!
While that was drying I started working on the top hat. I cheated a little on this and used a small Styrofoam coffee cup as my base for the top hat. Remove the bottom of the cup and then cut the height of the cup down.
Using the black glitter paper cover the cup, see above, then cut out the rim and top of the hat. Simply assemble this with glue. I found that for this the glue gun did not work well, I would suggest another strong fast drying glue. Once the hat was dry, trim with ribbon, and little holly leaves from felt and red beads for berries and snow glitter.
Once the snowman body is dry attach to the plastic white snowflake ornament,add the ribbon scarf, buttons and the wire arms. The face was created with 2 Victorian shoe buttons, hole punches from the black glitter paper and a cone of orange felt.
I think he turned out pretty darn cute!
Happy Holidays and Happy Crafting!
Linking-up With:
Mad in Crafts, Embellishing Life, The Southern Institute, Not Just a Housewife, Sugar Bee Crafts, Todays Homework Be Inspired, Mommy by Day Crafter by Night, Giggles Glitz & Glam, Project Queen, My World Made by Hand, Home for the Holidays, The Shady Porch, Gingersnap Crafts, Handy Man Crafty Woman, Someday Crafts, Free Pretty Things, The Stuff of Success, Wow Us Wednesdays, CherishedBliss, Somewhat Simple, A Glimpse Inside, House of Hepworths, Thrifty Thursday, Thrifty 101, 36th Ave., Blissful & Domestic, Project Queen, Artsy Girl Connection, Whipper Berry, Simply Designing, Finding Fabulous, Fingerprints on the Fridge, My Simple Home Life. French Country, Creation Corner, Lolly Jane, Funky Junk Interiors, Be Differnt Act Normal


I love the snowmen, yours are so cute. Well done! Merry Christmas
ReplyDeleteVery cute! My girls will love making these with me. Thanks for sharing the idea. :)
ReplyDeleteHe is pretty darn cute, I'm gonna have to make these myself. I never knew you could unroll cotton balls? Gosh where have I been. Thanks for showing us how to make. Thanks for sharing over at Sunday's Best. It's always great to see what you've been up to.
ReplyDeleteOkay, you have now become the queen of amazing dollar store crafts! This is SOOOO CUTE! You inspired me to create my own dollar store snow globe/cake stand, which I haven't quite finished yet. And now I want to make one of these! :)
ReplyDeleteOh, they are sooo cute, I absoltely love them! I'm a new follower, please drop by when you have a chance.
ReplyDeleteHe is to stinken cute. I love the top hat. I would love for you to join my weekly linky. Fri-monday come strut your stuff. (etsy welcome too)
ReplyDeletehttp://bacontimewiththehungryhypo.blogspot.com/2011/11/christmas-tree-craft.html
He is super cute! Thanks for sharing! I'm your newest follower via Creative Blogger Party and Hop
ReplyDeleteTOOO STINKIN CUTE!!!! I am your newest follower!!! Hope you will come take a look at my CHAOS!!!
ReplyDeleteWell, I'm a sucker for snowmen and I am so impressed by this little guy! great work, thanks for sharing the how-to. found you over at Sue Bee Crafts ... come visit, @ http://robinlynnsroad.blogspot.com/2011/11/tis-season.html
ReplyDeleteBlessings!
They look great. Very clever
ReplyDeleteVery cute. Thank you for linking to Totally Tutorial Tuesdays :)
ReplyDeleteWow - love your snowman! Your newest follower, Karima
ReplyDeleteSo adorable!
ReplyDeleteDee
Oh my goodness, I cannot even tell you how much I LOVE this cute little snowman!? I'm adding it to my winter pinterest board. It gives me warm fuzzies!!!
ReplyDelete: ) Jaimee @ craft-interrupted.blogspot.com
Your snowman is so cute! I grew up in Southeast Texas, so I know what you mean about not enough snow to make a snowman.
ReplyDeleteI love this craft! super cute stuff :)
ReplyDeleteLina
Cute, cute, cute!
ReplyDeletehugs and happy holidays from Savannah, Cherry
He is such a cutie! I can't believe the supplies you used... I would have never guessed the cup! Thanks for sharing with us!
ReplyDeleteWonderfully adorable! Love the way you did the hat. Very creative.
ReplyDeleteHe's adorable!
ReplyDeleteI can't believe how cute this snowman is! You did such a great job! I'd love for you to share with my readers if you have a moment. Thanks so much for sharing! http://www.momontimeout.com/2011/11/taking-timeout-thursday-no-6.html
ReplyDeleteOh yeah! I just pinned this too! Too cute!
ReplyDeleteMy little girl would find this guy mesmerizing.
ReplyDeleteThank-you so much for joining our Pin'Inspiration party. Would love for you to hop over and grab a button.
Happy follower.
Posted on Facebook! Have a great weekend :)
ReplyDeleteVery pretty! Thank you for joining me at Home Sweet Home!
ReplyDeleteSherry
oh wow oh wow oh wow! Thanks for sharing this with us! What a GREAT snowman! Would you please share this with my readers for Fun Stuff Fridays linky party? http://www.toysinthedryer.com/2011/12/fun-stuff-fridays-2.html
ReplyDeleteHe's so cute!! Thanks for sharing!!
ReplyDelete